Blender Animation Tutorial
Jan 16, 2016 23:01:49 GMT
Post by blackmailchan on Jan 16, 2016 23:01:49 GMT
{Spoiler}{References To Use}https://www.youtube.com/watch?v=zrqOAwCPowg
(Executable file, download binary.zip!!! ) www.cs.ubc.ca/~van/papers/2011-TOG-quadruped/index.html
vanat.cvm.umn.edu/gaits/walk.html
(Executable file, download binary.zip!!! ) www.cs.ubc.ca/~van/papers/2011-TOG-quadruped/index.html
vanat.cvm.umn.edu/gaits/walk.html
{Spoiler}{Getting Started/ How to Animate}
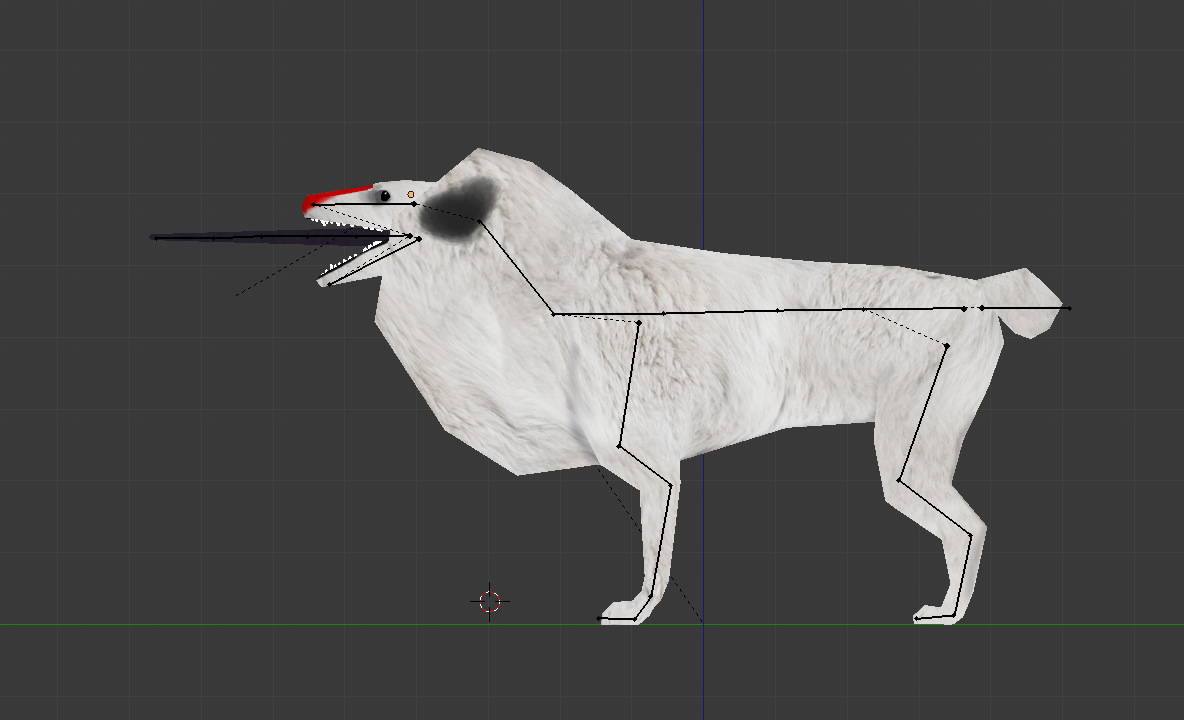
First, your model must meet two requirements to be animated. It must have armature, and it must be skinned. Rigging is the process of creating bones, skinning is the process of parenting vertices to each bone.
A Rigged Model
A Skinned Model
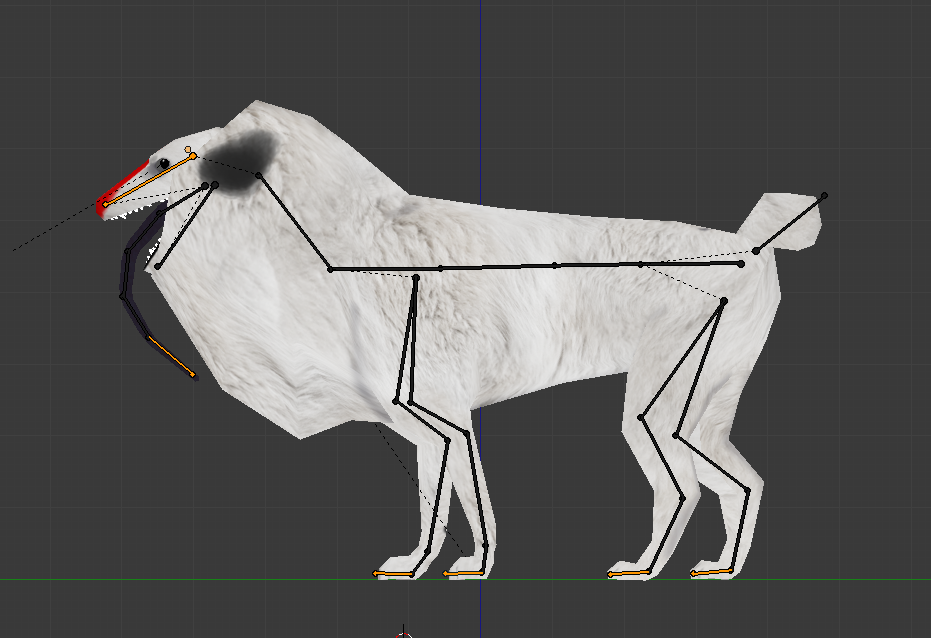
A skinned model will move with the armature in pose mode. If you have your model skinned, it's ready to be animated!
When you initially go into Animation Mode you will see this.
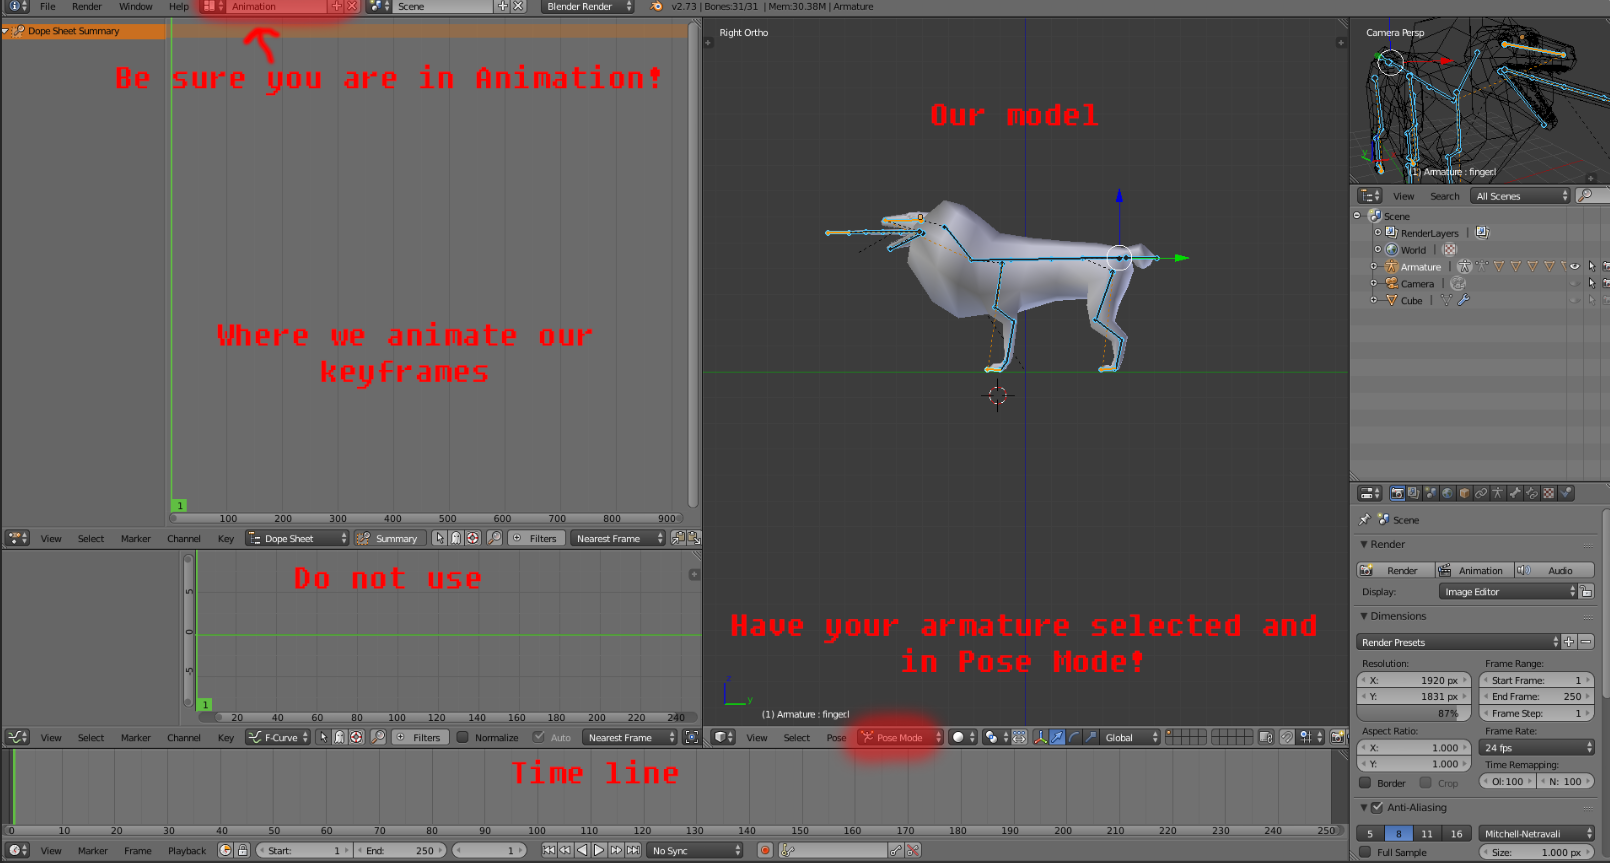
This is how I set up my screen for animating: Remove the F Curve window and change Dopesheet to Action Editor
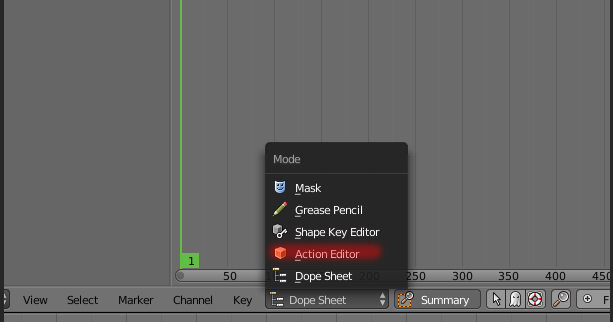
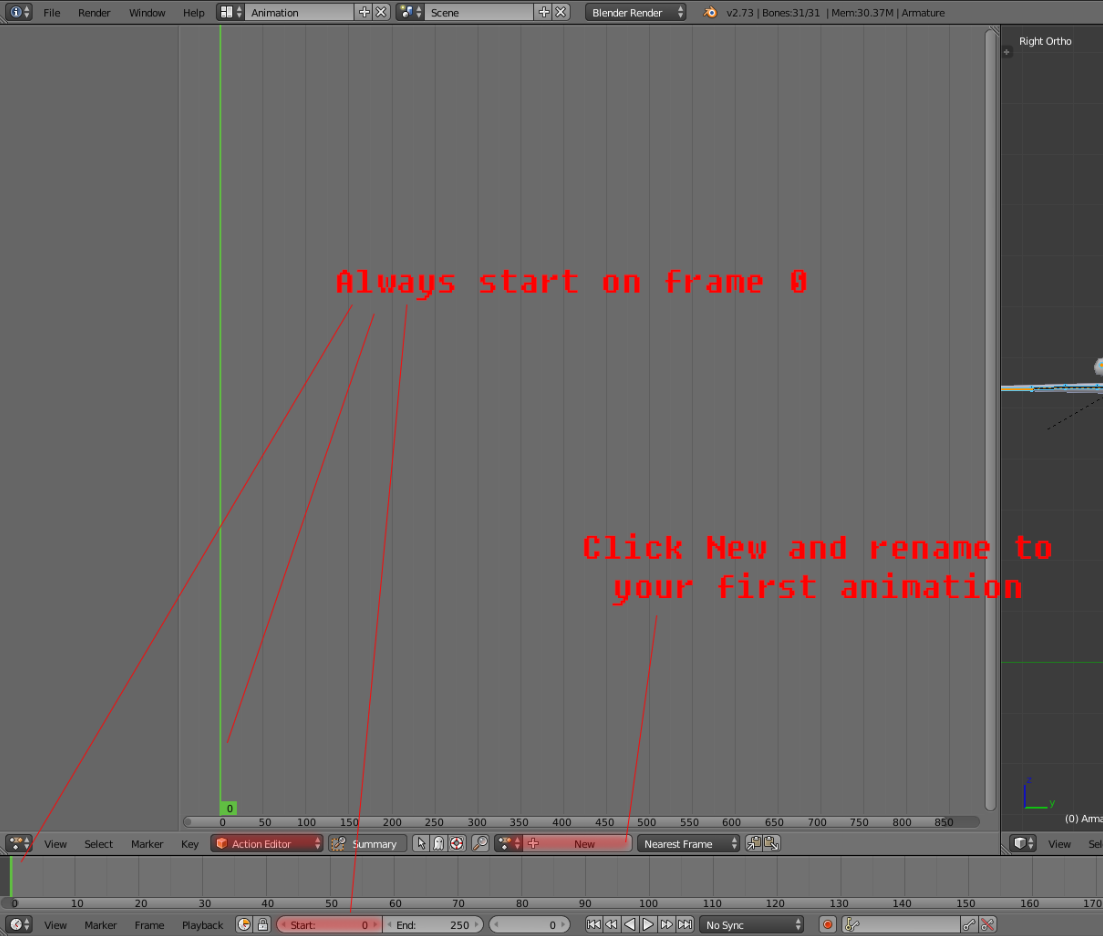
Here is the basic anatomy of the Action Editor.
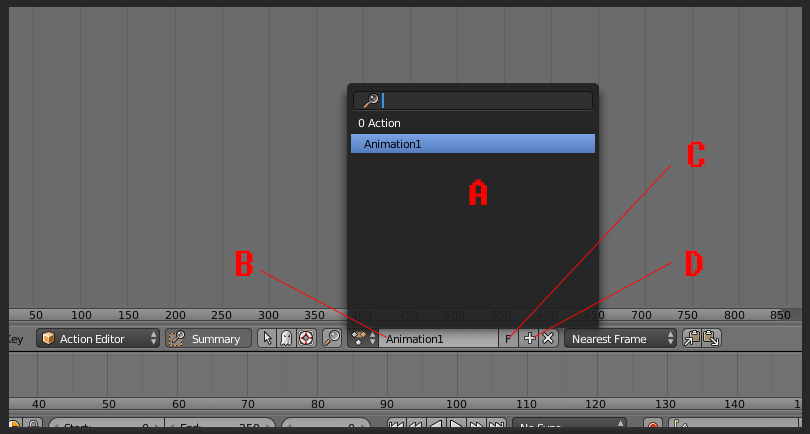
A. This is where all your separate animations will be. Walk, Run, Idle, etc. etc. You can choose from this list to pick one and edit them individually.
B. This is the name of the current animation you have selected. Any changes you make to the keyframes affect this animation alone.
C. The F is to save the animation. A saved animation will have an "F" next to it in the panel where A is located. If you don't save it/ it has a 0 or nothing next to it's name, the next time you open blender, that animation will have deleted itself. So PRESS F ALWAYS! You only need to press this once. Pressing F again will unsave the animation, and pressing the "2" that appears when you press F will duplicate the animation.
D. The plus creates a brand new animation for you!
Now we begin animating!
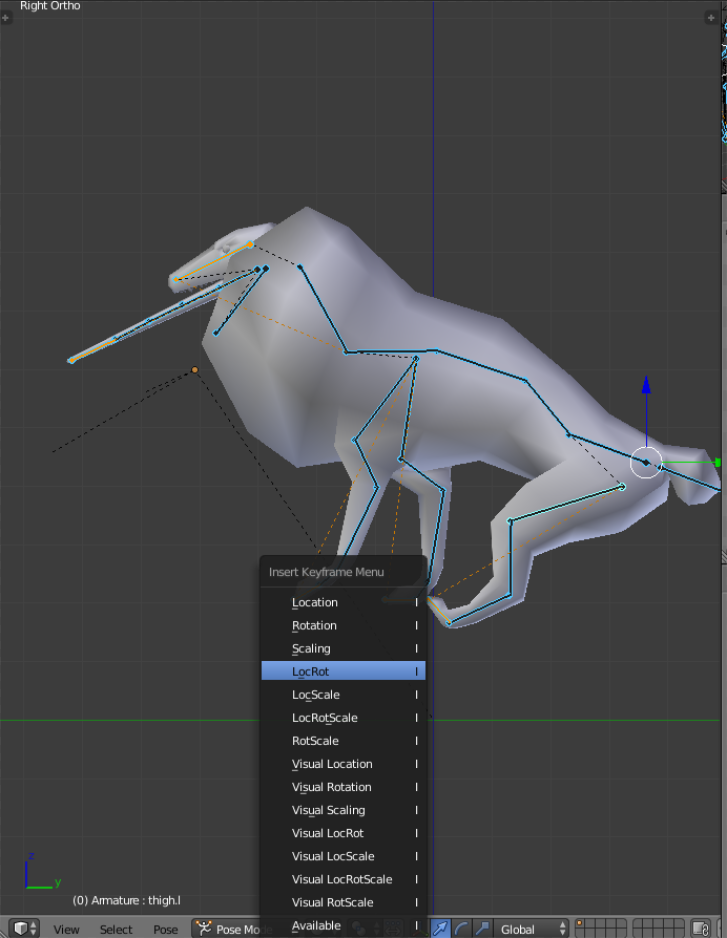
Begin by posing the first frame of your animation. Just pose the bones in any way you would like. If you pose them in a way you don't like and want to start over, Select the bones you want to reset to normal, and press ALT+R (Reset rotation), ALT+G (Reset position), and/or ALT+S(Reset scale). Generally I hit all of them when I'm trying to reset my bones. Once you have a position you would like to save, select all the bones you want to save positions for, hit I and select LocRot (LocationRotation). If you scaled anything, LocRotScale. I generally find saving scale useful just incase any of your animations will involve scaling, so that the scale doesn't remain when your model plays the next animation.
First, your model must meet two requirements to be animated. It must have armature, and it must be skinned. Rigging is the process of creating bones, skinning is the process of parenting vertices to each bone.
A Rigged Model

A Skinned Model

A skinned model will move with the armature in pose mode. If you have your model skinned, it's ready to be animated!
When you initially go into Animation Mode you will see this.

This is how I set up my screen for animating: Remove the F Curve window and change Dopesheet to Action Editor


Here is the basic anatomy of the Action Editor.

A. This is where all your separate animations will be. Walk, Run, Idle, etc. etc. You can choose from this list to pick one and edit them individually.
B. This is the name of the current animation you have selected. Any changes you make to the keyframes affect this animation alone.
C. The F is to save the animation. A saved animation will have an "F" next to it in the panel where A is located. If you don't save it/ it has a 0 or nothing next to it's name, the next time you open blender, that animation will have deleted itself. So PRESS F ALWAYS! You only need to press this once. Pressing F again will unsave the animation, and pressing the "2" that appears when you press F will duplicate the animation.
D. The plus creates a brand new animation for you!
Now we begin animating!
Begin by posing the first frame of your animation. Just pose the bones in any way you would like. If you pose them in a way you don't like and want to start over, Select the bones you want to reset to normal, and press ALT+R (Reset rotation), ALT+G (Reset position), and/or ALT+S(Reset scale). Generally I hit all of them when I'm trying to reset my bones. Once you have a position you would like to save, select all the bones you want to save positions for, hit I and select LocRot (LocationRotation). If you scaled anything, LocRotScale. I generally find saving scale useful just incase any of your animations will involve scaling, so that the scale doesn't remain when your model plays the next animation.

Everytime you press I, you have to pick how you want the bone to be saved. If you aren't going to vary this up, you can change this so that everytime you press I, it adds your keyframes without you having to go another step.
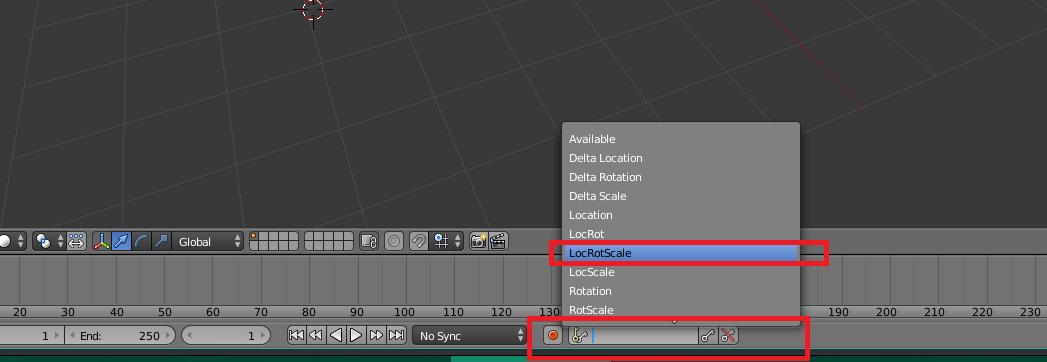
Down here on this empty field, click the keys and select LocRotScale. Now everytime you press I, it will save your keyframes automatically!
Now you should see your first keyframe on the Action Editor and the Timeline!
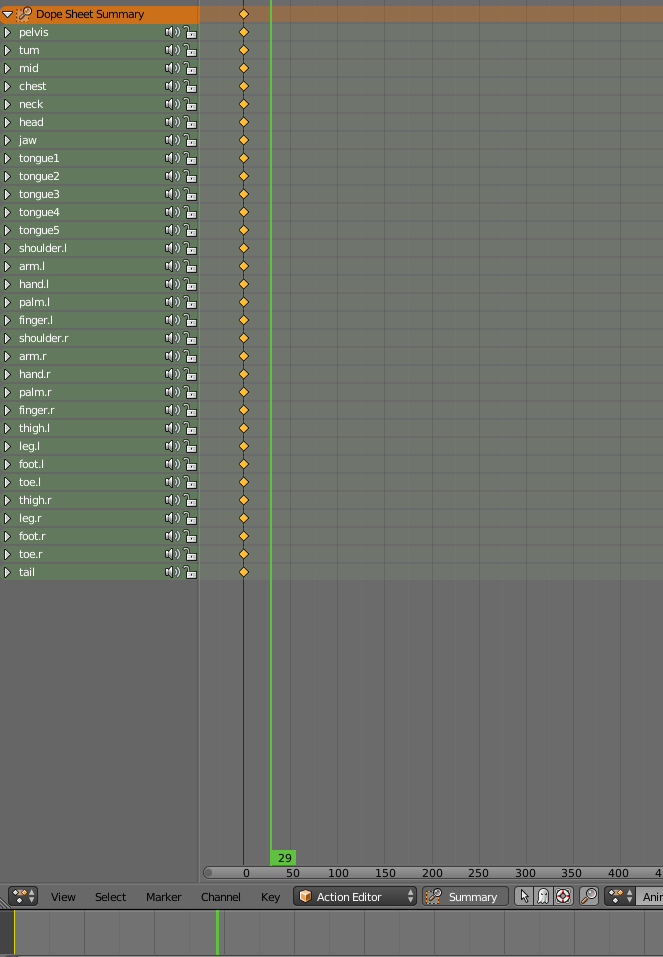
Keyframes cannot be moved or altered on the Timeline, but that's what the action editor is for!
Orange dots are selected, and you can use G to slide them around. L will select rows, K will select columns. If you want to select particular columns, hold shift and right click to select singular dots in each column and press K. Same goes for rows. Shift+D will duplicate frames as well. If you press I and insert a keyframe on top of an existing one, your new keyframe will overwrite the one you're on. X will delete these frames or single dots.
You can also see the names of your bones on the side so that you know which dot controls which key. If you left click on a bone name to select it and press X, you will remove that entire row of frames.
Left clicking on either the timeline OR the action editor will move your currently selected frame position. Please be careful to move this before you create a new frame, otherwise you'll unintentionally overwrite your last frame.
The rest of this tutorial is for getting down the basic motions of a high movement animation. If you have any more questions about timelines and the action editor, please ask me!
{Spoiler}{Basic Motion}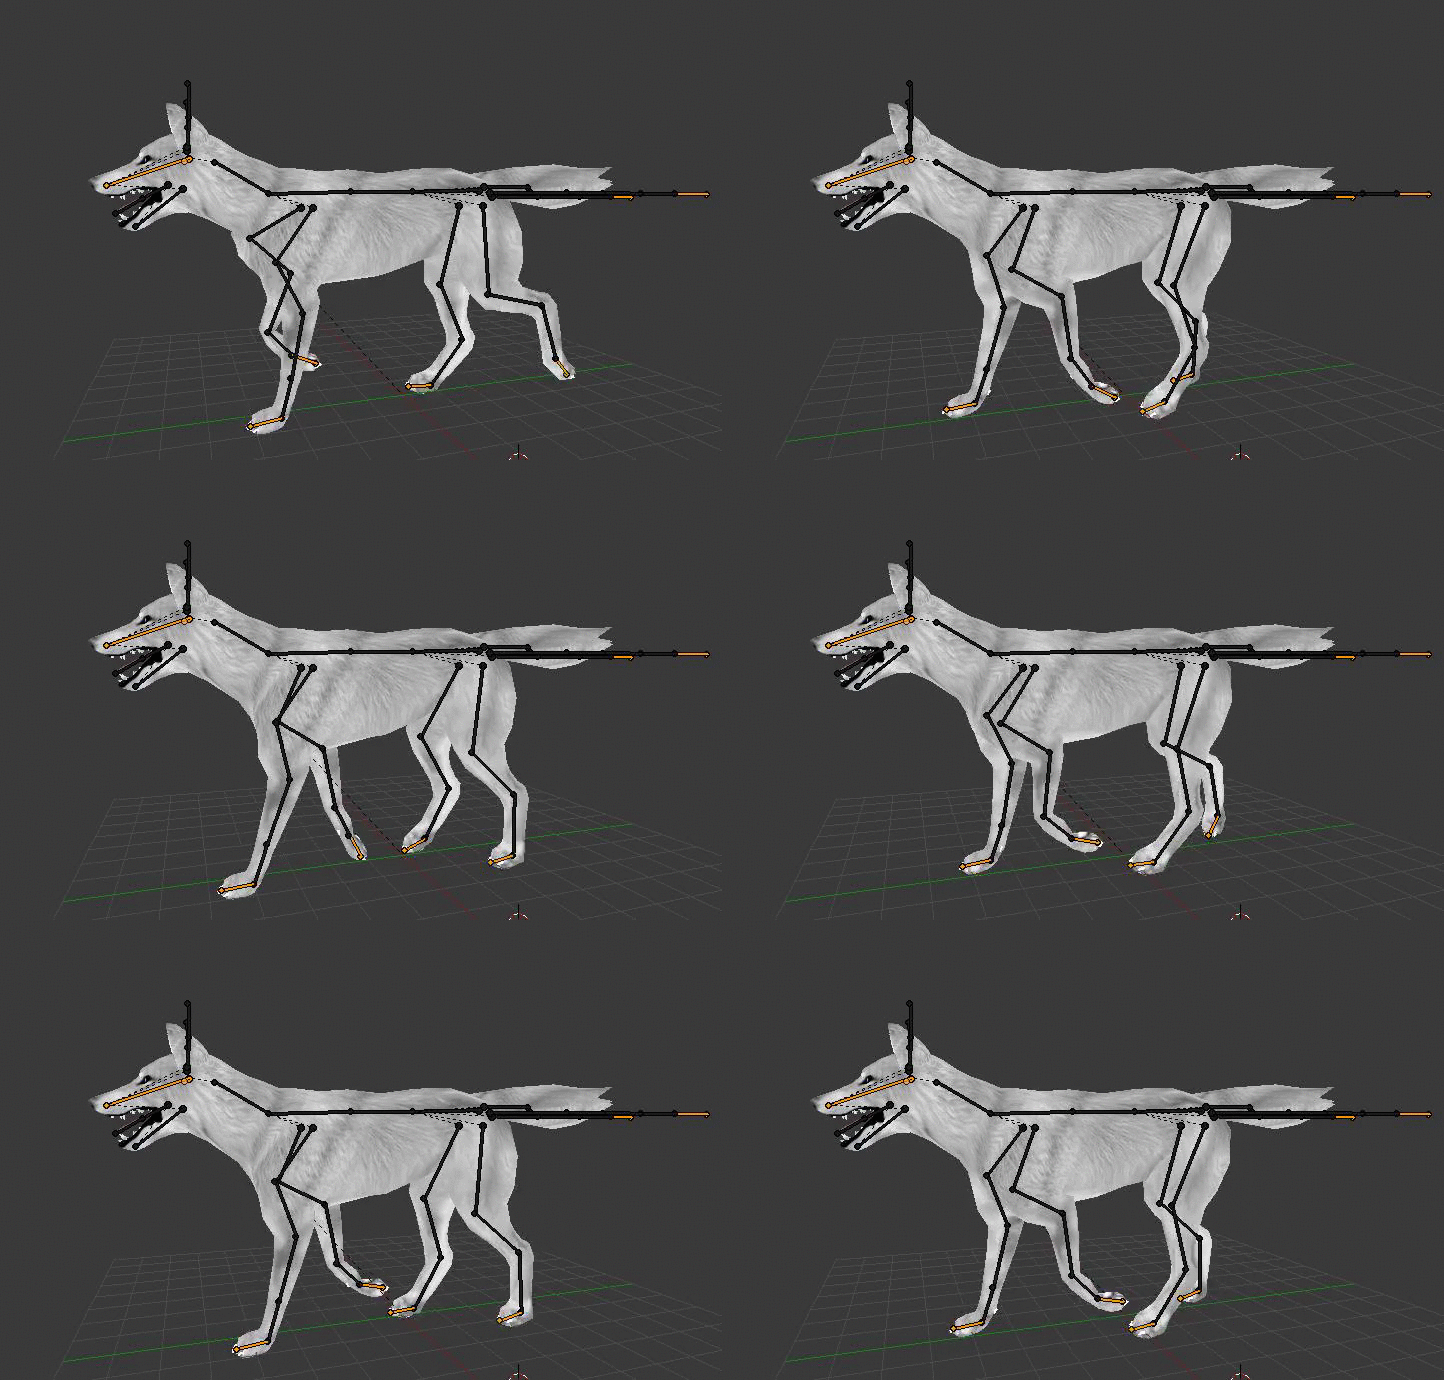
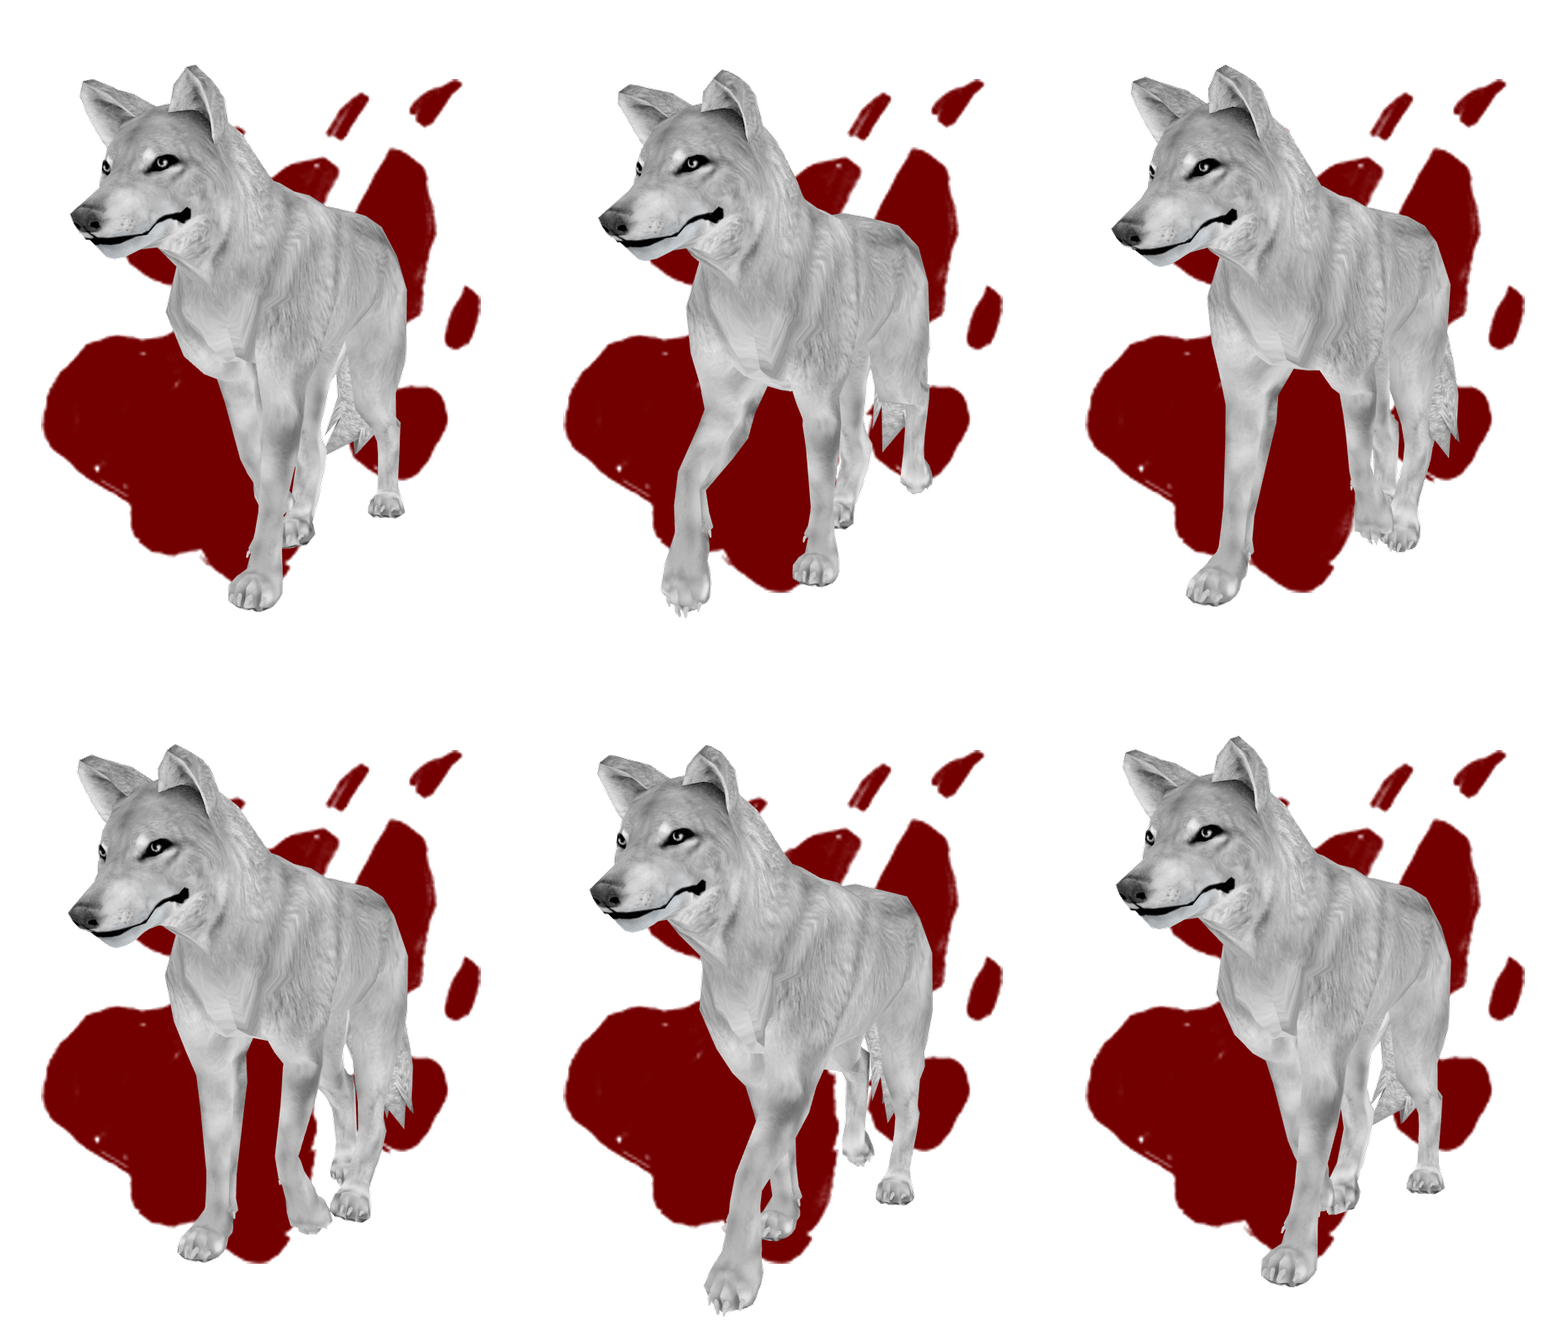
This is a basic walk cycle, and the motion starts in the legs of course. Decide where your basic motion starts by which body part is going to be moving first, all the rest of the bones will be pushed and pulled according to how the main bones are moved. With walk cycles, I first animate the legs walking together, and then move the leg frames so that the legs linger behind the arms because naturally the legs and arms of a dog do not move together, but instead the legs are late.
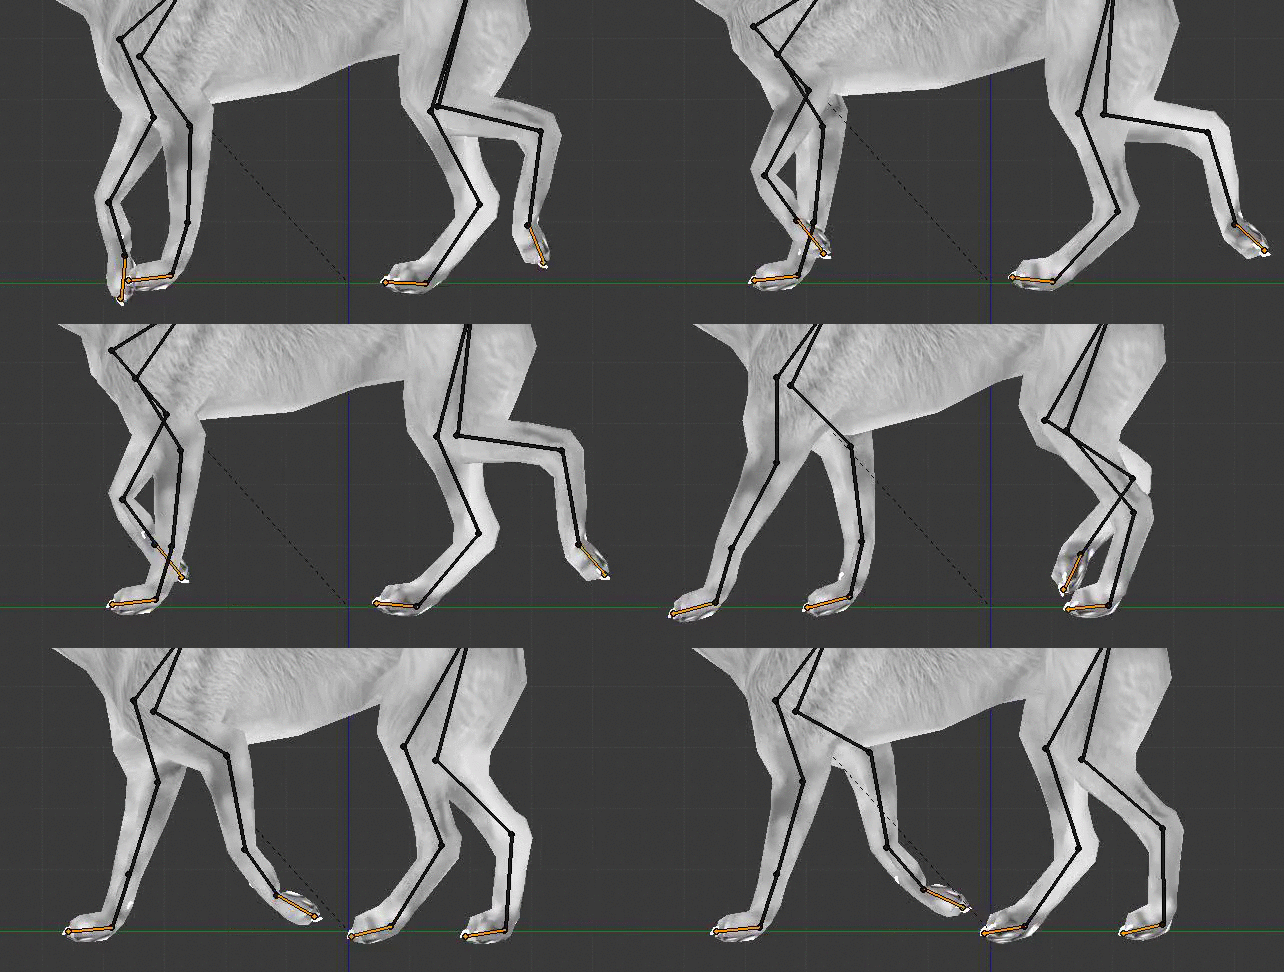
BEFORE
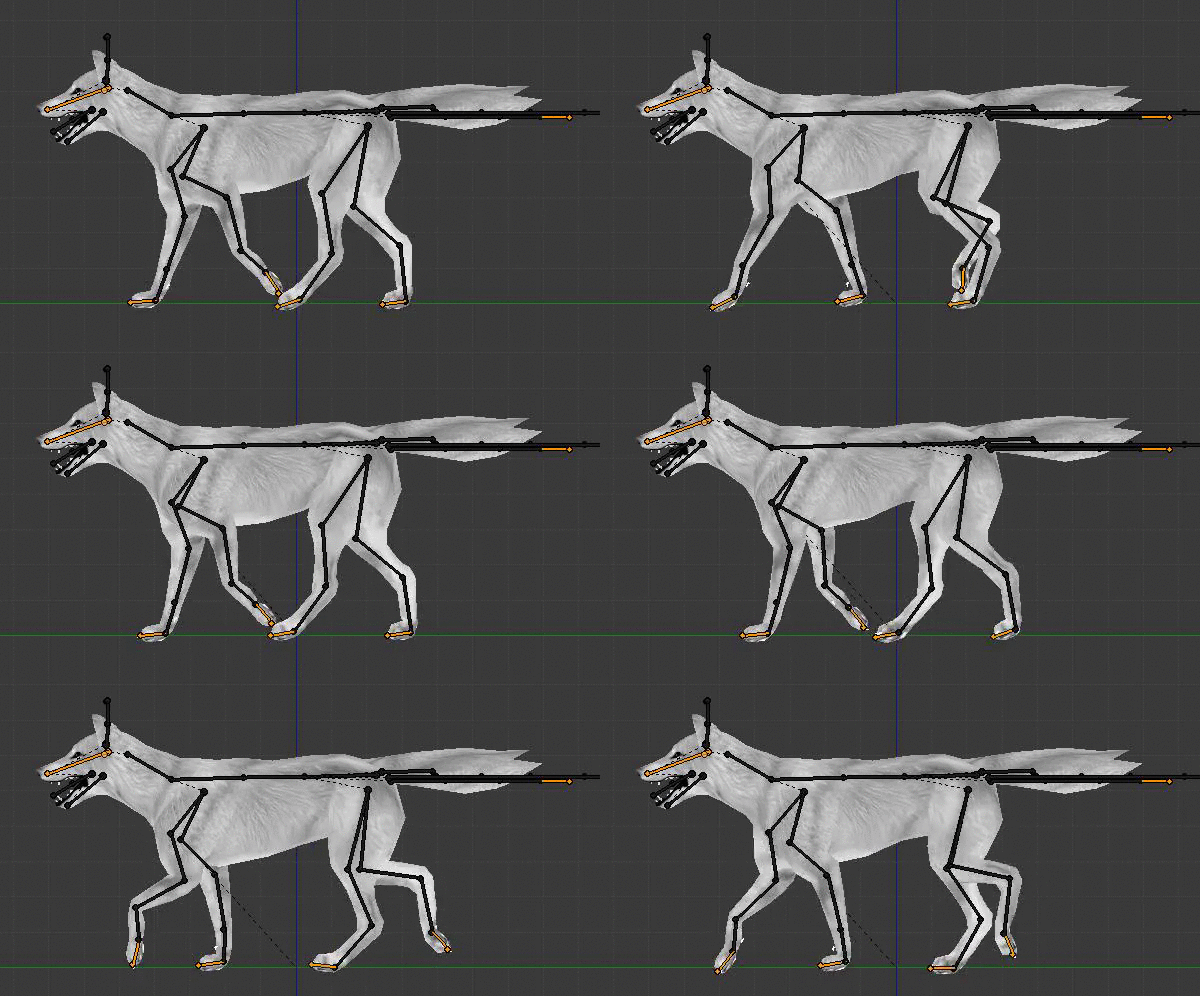
The gait is weird and staggers. The legs swing forward and stop short of the full motion, they also lift off of the ground far too soon. The amount of time the legs spend in air is equal to the amount of time spent on the ground. This is bad.
AFTER
The gait is more controlled, in walking gaits, the feet are on the ground twice as long as they are in the air. 2 seconds on the ground, 1 in the air swinging. There are 6 unique frames within this animation- two of which are the legs swinging, and the four are the legs on the ground.
The feet slide along the floor evenly and don't stagger- this is acheieved by looking very closely at your grid lines. I make sure the nails of the paw touch the following line of each square on the grid to keep them sliding at an even rate.

This is a basic walk cycle, and the motion starts in the legs of course. Decide where your basic motion starts by which body part is going to be moving first, all the rest of the bones will be pushed and pulled according to how the main bones are moved. With walk cycles, I first animate the legs walking together, and then move the leg frames so that the legs linger behind the arms because naturally the legs and arms of a dog do not move together, but instead the legs are late.

BEFORE
The gait is weird and staggers. The legs swing forward and stop short of the full motion, they also lift off of the ground far too soon. The amount of time the legs spend in air is equal to the amount of time spent on the ground. This is bad.

AFTER
The gait is more controlled, in walking gaits, the feet are on the ground twice as long as they are in the air. 2 seconds on the ground, 1 in the air swinging. There are 6 unique frames within this animation- two of which are the legs swinging, and the four are the legs on the ground.
The feet slide along the floor evenly and don't stagger- this is acheieved by looking very closely at your grid lines. I make sure the nails of the paw touch the following line of each square on the grid to keep them sliding at an even rate.
{Spoiler}{Secondary Motion}
Now we begin animating the bones closest to our main bones! And that would be our spine! When walking, as the front legs spread apart, the chest goes down, and as front legs come together, the chest lifts. The same thing goes for our back legs. Since they are out of sync, our chest and back are constantly teeter tottering- so that there is a constant up and down motion between the two of them.
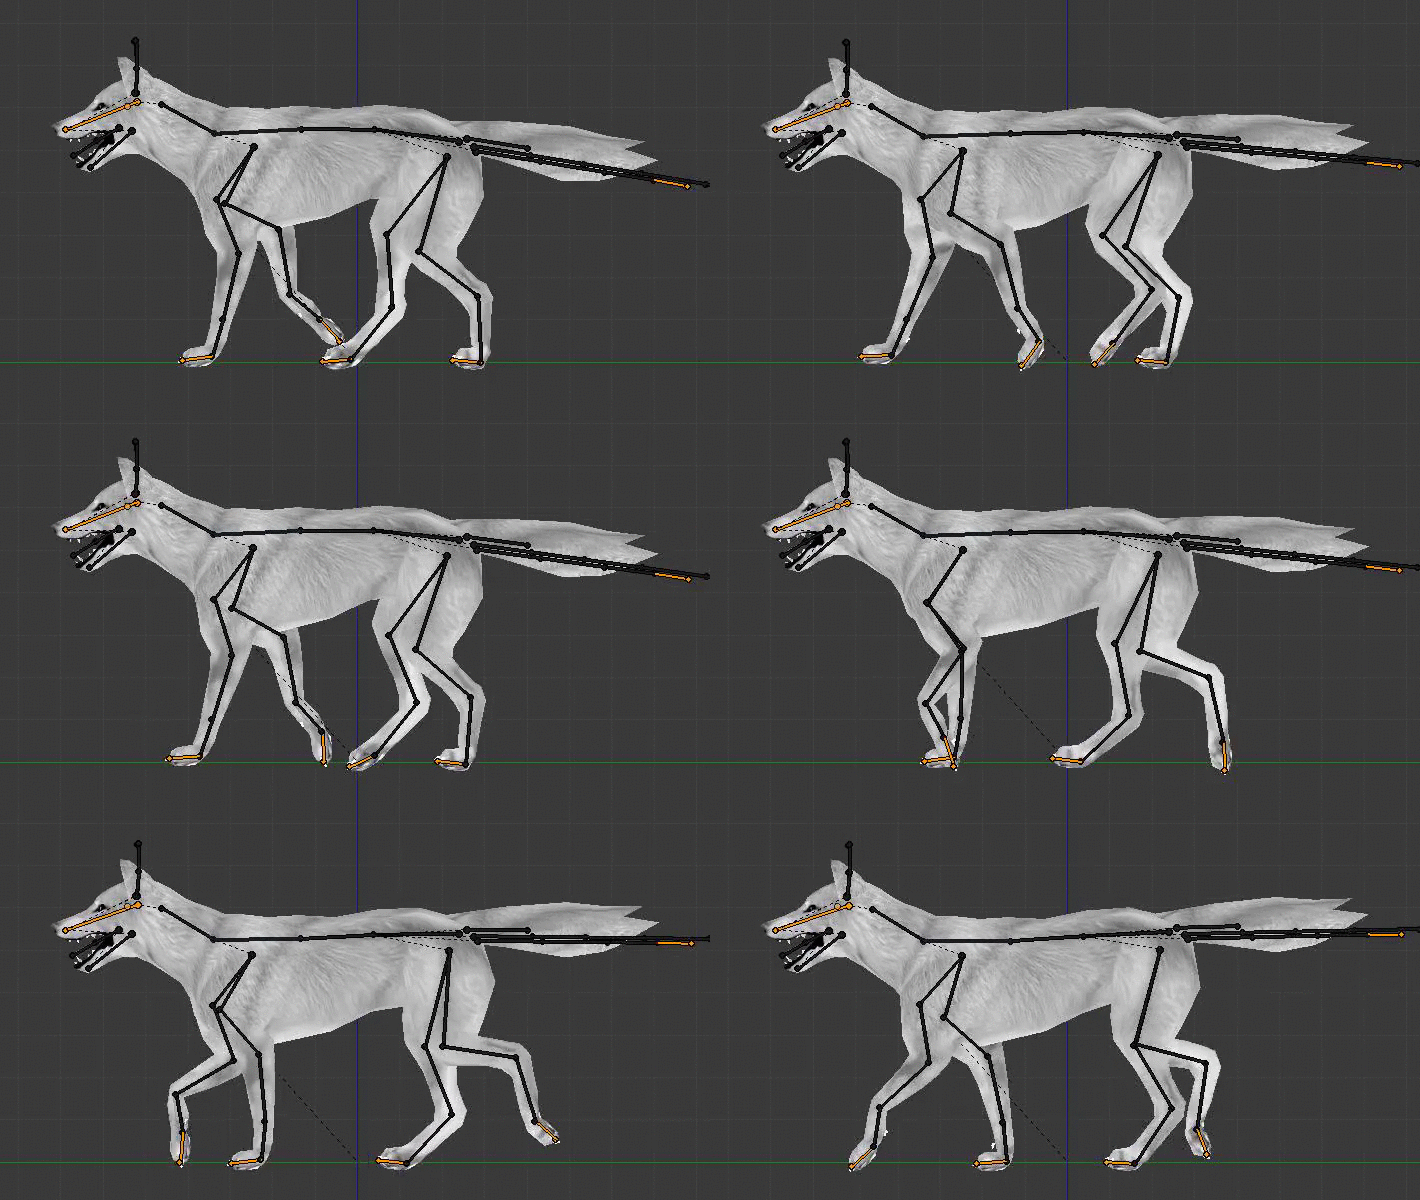
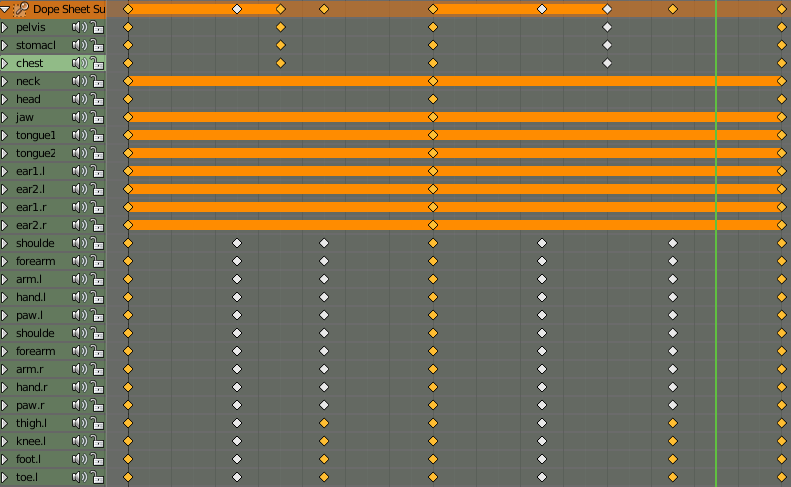
Take care to reposition the legs after moving the spine. You'll also notice that my spine movements operate on only four frames throughout the entire movement of the legs.
Now we begin animating the bones closest to our main bones! And that would be our spine! When walking, as the front legs spread apart, the chest goes down, and as front legs come together, the chest lifts. The same thing goes for our back legs. Since they are out of sync, our chest and back are constantly teeter tottering- so that there is a constant up and down motion between the two of them.

Take care to reposition the legs after moving the spine. You'll also notice that my spine movements operate on only four frames throughout the entire movement of the legs.

{Spoiler}{Tertiary Motion}
Now that our back has motion, we can do the head!
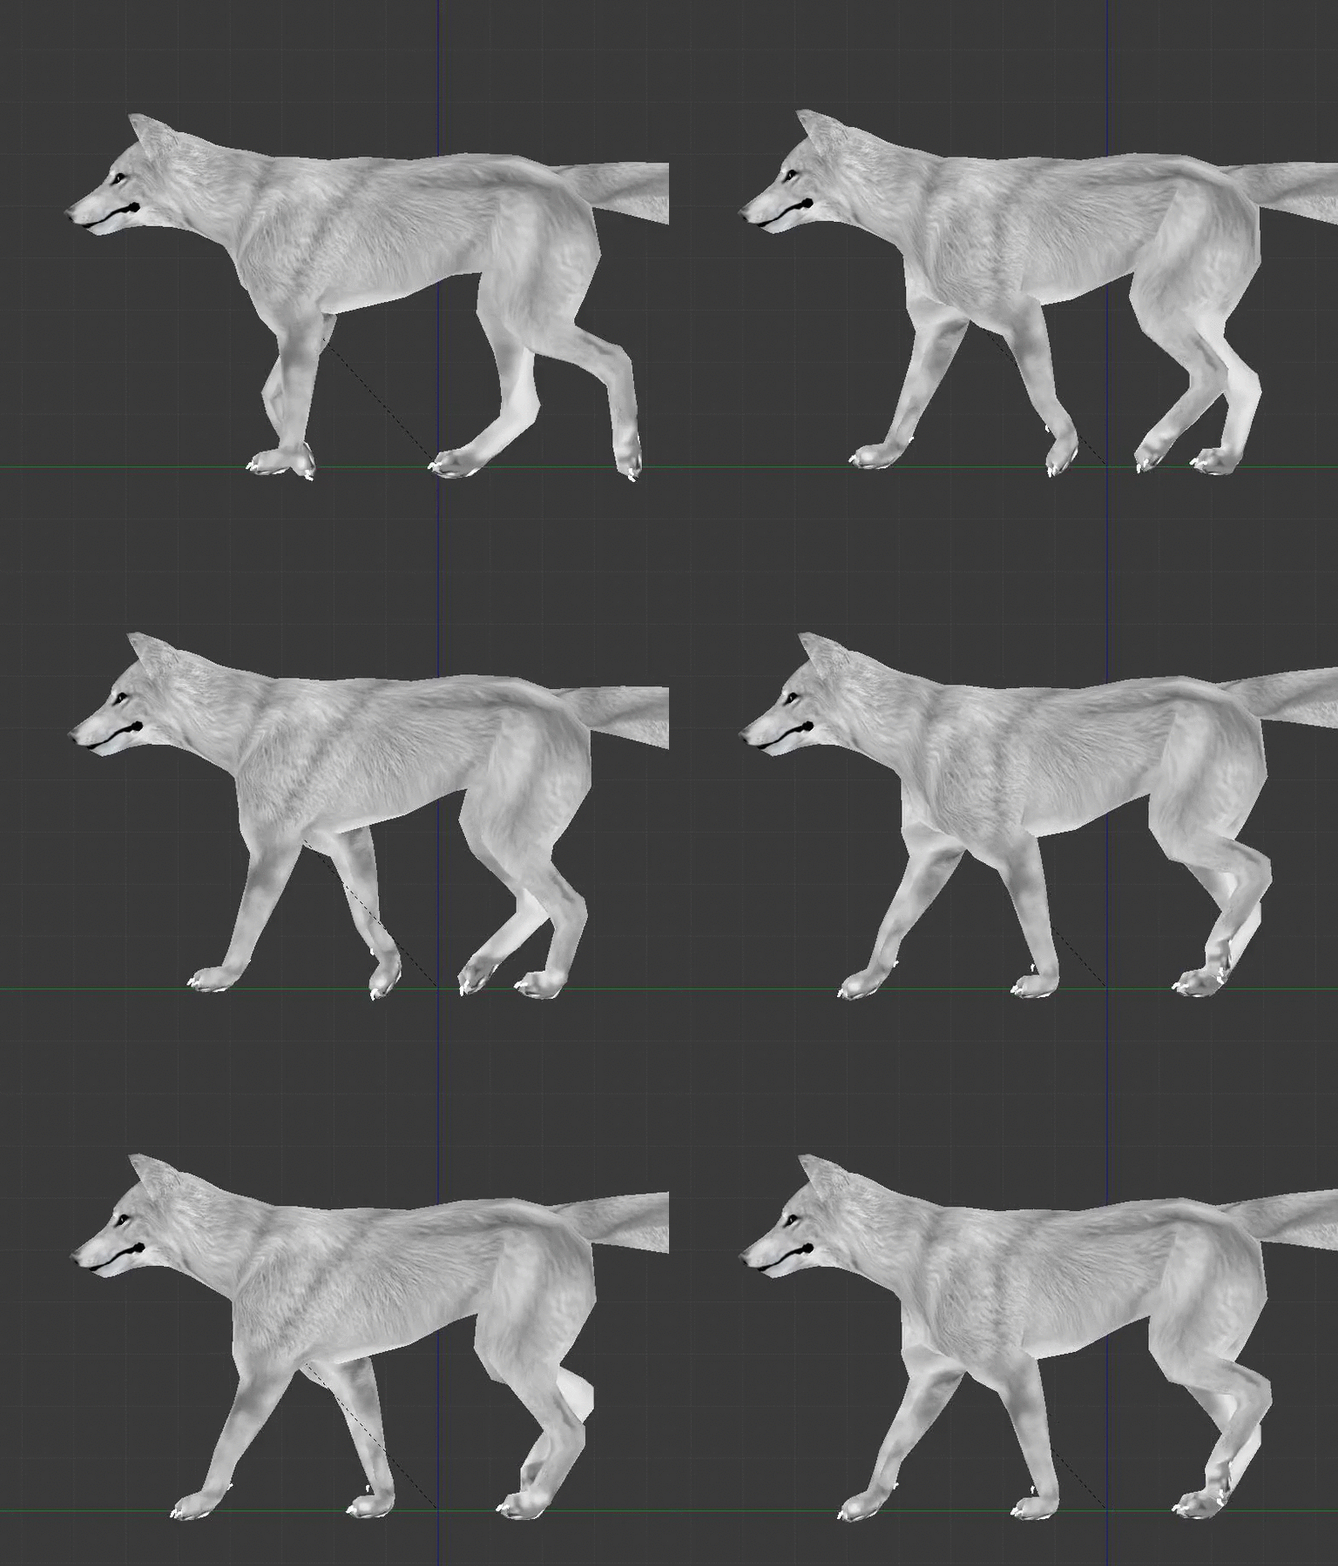
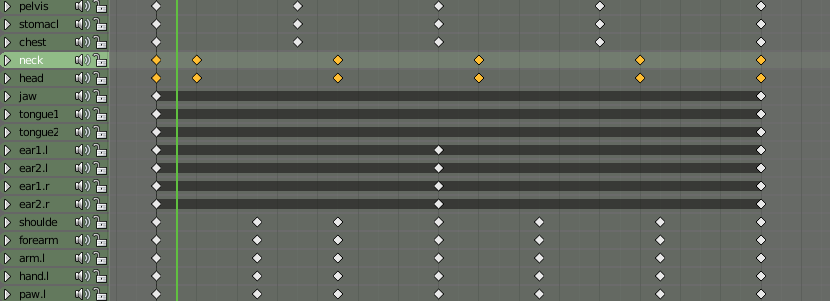
From what you can see in the reference videos, dogs tend to subconsciously stabilize their head movements to their body movement, and so I have the head moving completely off sync with the rest of the body in a very very gentle, subtle way.
Tertiary motion is particularly only affected by the secondary motion, and in most cases the head will move entirely differently from the rest of the body because there's more control that the animal has over it. Some will perfectly stabilize it as they run ( like birds ) and others will let their head flail about when they move. The more drastic the motion- the more limp the head will go. Let your neck ALWAYS move with your head. Even the tiniest movement of the head will affect the neck- so don't discriminate in moving both.
I gave the head a slight bounce from the motion of moving up and down against gravity.
Now that our back has motion, we can do the head!


From what you can see in the reference videos, dogs tend to subconsciously stabilize their head movements to their body movement, and so I have the head moving completely off sync with the rest of the body in a very very gentle, subtle way.
Tertiary motion is particularly only affected by the secondary motion, and in most cases the head will move entirely differently from the rest of the body because there's more control that the animal has over it. Some will perfectly stabilize it as they run ( like birds ) and others will let their head flail about when they move. The more drastic the motion- the more limp the head will go. Let your neck ALWAYS move with your head. Even the tiniest movement of the head will affect the neck- so don't discriminate in moving both.
I gave the head a slight bounce from the motion of moving up and down against gravity.
{Spoiler}{Advanced Motion}This is where you have the option to make the other parts of the body move entirely separate from your regular motion- or have it move along. No matter what- every single bone in your body should be moving in every type of animation. Don't let anything be left behind!
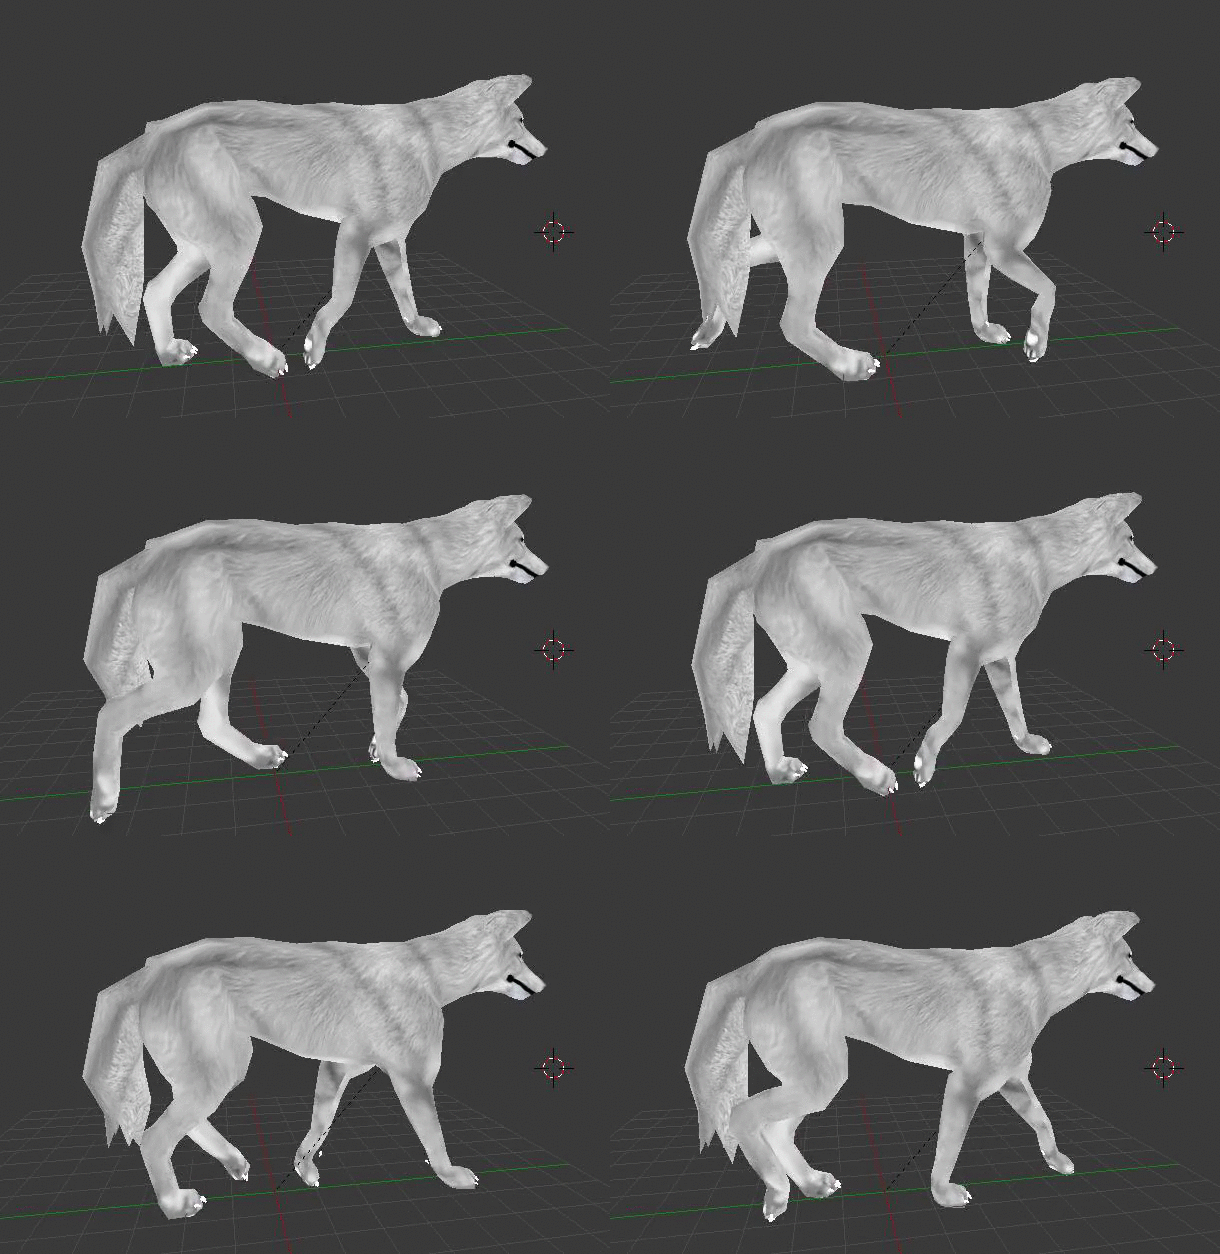
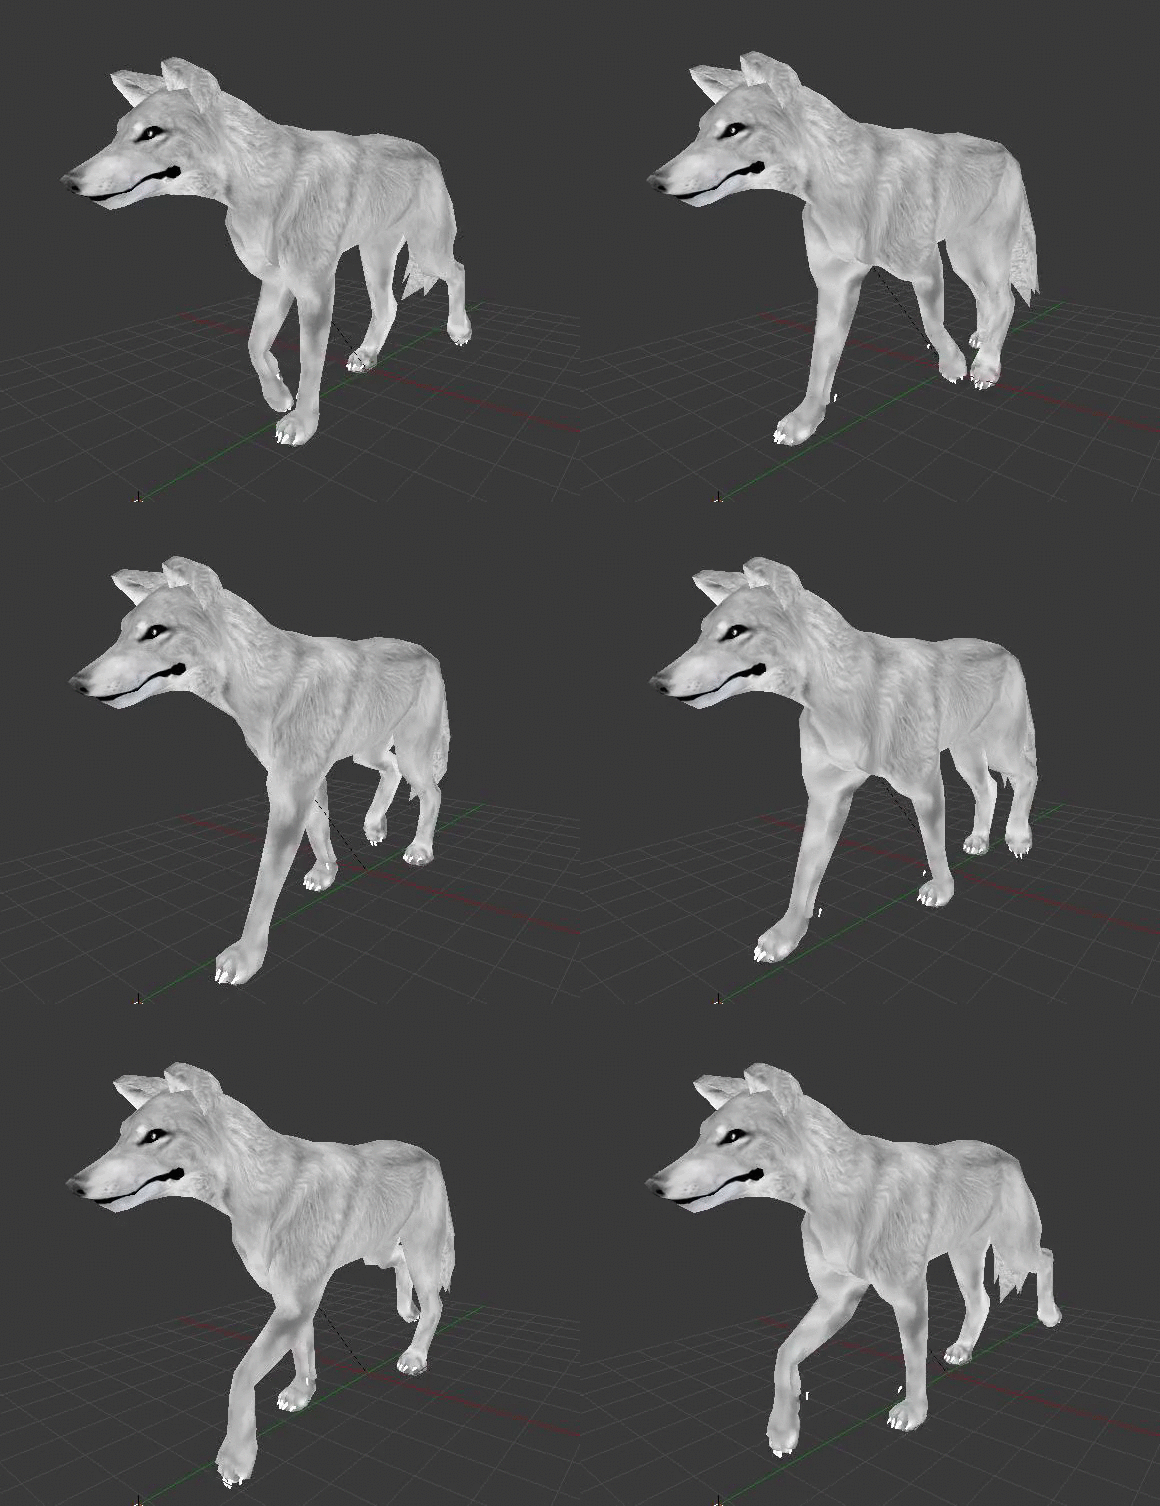
A slight bounce has been added to the ears, and the tail is also now moving on its own and with the rest of our body as well. We got every part moving! But we're not done yet.


A slight bounce has been added to the ears, and the tail is also now moving on its own and with the rest of our body as well. We got every part moving! But we're not done yet.
{Spoiler}{Get Technical}We've only animated from one side, and just like how it's a bad idea to model from one angle, it's a bad idea to animate from one as well. We need to make sure our animation looks nice from the front, back, top and bottom and make sure that our animation looks less one-sided.
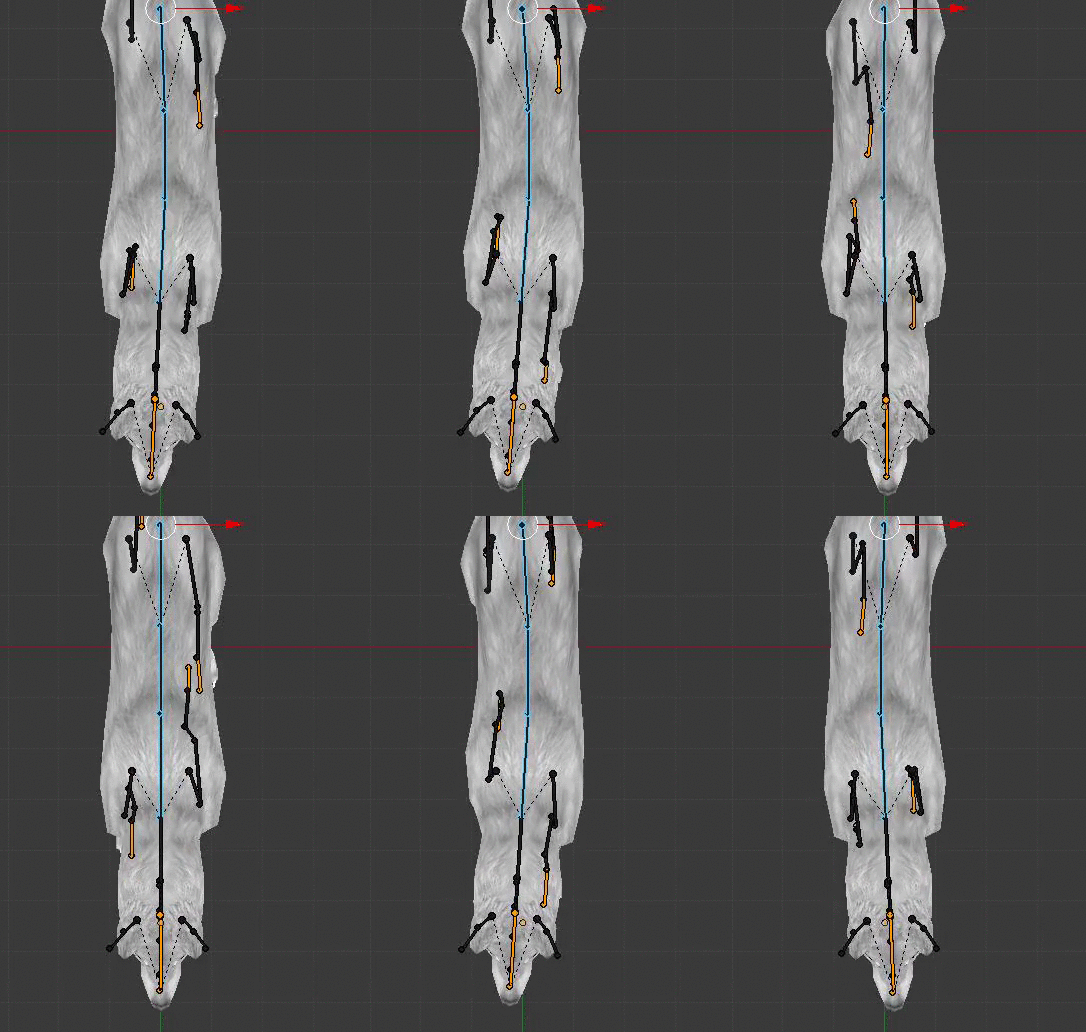
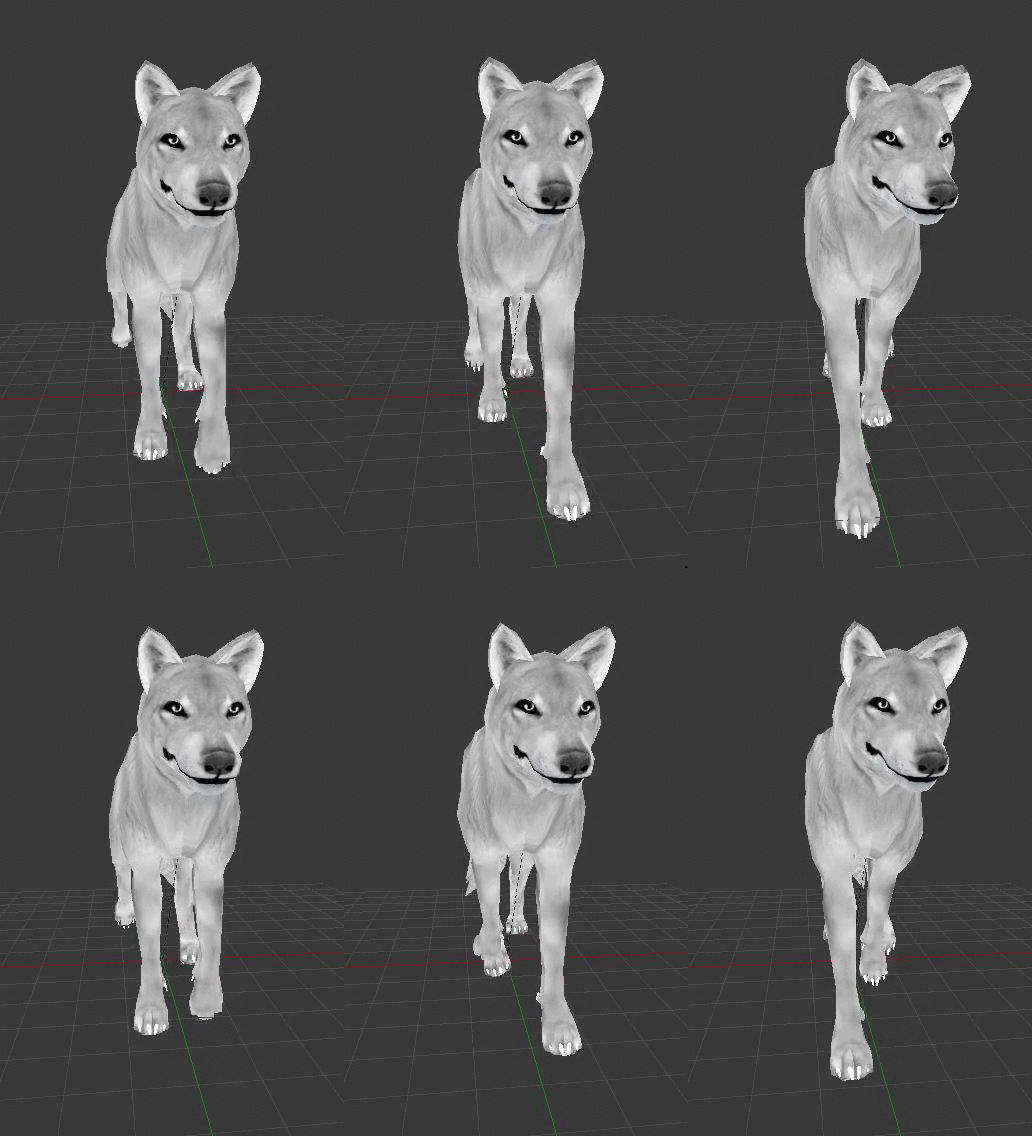
I also went and added some inverse motion to the head trying to push itself back toward the center, and made sure the legs weren't moving outward and instead inward.


I also went and added some inverse motion to the head trying to push itself back toward the center, and made sure the legs weren't moving outward and instead inward.
Finished!
{Spoiler}